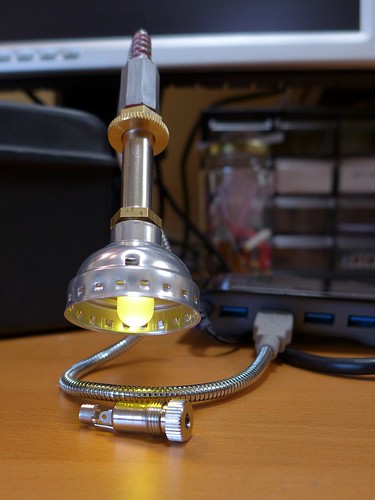
Found @ CRASH Space No 6. – USB LED Light goes Dieselpunk

So there was a delay this week in the F@CS series. Why? Because I met my match in a part that is taking more research than I originally intended. It has the location of a factory printed on it so I’m doing a bit more humanities-style research on it. Please stay tuned.
The change-of-course-project is a mod of an USB LED light. I stumbled onto an inspiring Instructable by Winged Fist called Dieselpunk USB Lamp that has links to other Dieselpunk and Steampunk style mods for modern technology. My version uses more lamp-parts and 10mm LED, but the spirit is the same.
More pictures are up in a flickr set, including the original USB LED find from our donations pile.
If you decide to make your own, please note two important missing pieces from the Instructable: any mention of a current limiting resistor or a link to how to solder wires together. It is tiny, but you can see a resistor soldered to the lead wire of the LED in the Instructable. I would have liked him to call that out as important. I know the original current limiting resistor in my hacked object came out in the dismantle.
To make a lot of these without designing a PCB or soldering wires together, go to Mouser and order something like the Visual Communications Company’s CNX LED Socket with the integrated resistor option. They’ll be more stable than a wire to wire connection and the LED can be swapped in the future. Some items in the line have lens accessories. Also, they are less than a dollar if you are getting the part without lead wires.
Tools Used
- Wire Snips (Drawers on top of benches on the west wall of the large lab)
- Wire Strippers (Drawers on top of benches on the west wall of the large lab)
- Glue gun (Shelves above the benches on the west wall of the large lab)
- Small screwdriver (for dismantling the original) (Drawers on top of benches on the west wall of the large lab)
- Scissors (for trimming hot glue) (Drawers on top of benches on the west wall of the large lab)
- Soldering Iron (Shelves above the benches on the west wall of the large lab)
- Silver Sharpie (For the phono connector. My stash – but there may be one in the drawers on top of benches on the west wall of the large lab.)
Supplies Used
- Solder
- Hot Glue
- 470 Ohm Resistor (The dismantled light was using a 56 Ohm resistor. This makes sense given Ohm’s Law: 5 V / 100mA USB current limit = 50 Ohm. I wanted a lower voltage and less current on my chosen LED to maximize longevity and create a moodier light. The new circuit only draws around 10 mA. We have LOTS of resistors in the drawers on the east side of the large lab and on the shelves below in the “Misc Components” box. Thanks Steve G.!).
- 10mm White LED (10mm looked more bulb-like, found in the drawers on the east side of the large lab. Thanks Matt P. ?)
- The outside plastic sleeve from a Phono/RCA connector (Radio Shack)
- Lamp Parts (my stash, originally from Lampstuff.com)
- #09257 2 inch pipe, Nickel over Brass
- #08610 Solid Brass Knurled Nut
- #08631 Heavy Duty Brass Plated Nut
- #08453 Nickel Plated 1/8 IPS Lamp Socket Cap (i.e. the bottom part)

Hi, where can I buy this USB lamp ? I have very expensive in my local shop and lampstuff.com doesn’t want to load.
Daniel
Lampstuff.com doesn’t stock the USB light, it stocks the lamp parts I used to make the shade. Just search for “lamp parts,” but I’ll check the link. I found the actual USB light it in our scrap pile. Many are available in dollar stores, but I’d actually check ebay first. I found a few with just the search “USB LED” that had the same metal conduit sheath.