

OrcaSlicer – CrashSlicer feature branch
Active development of UX improvements, new capabilities, and visual polish for OrcaSlicer. These are open-source contributions in various stages of progress, check back for updates, photos, and build instructions as each feature matures.
View fork on GitHubFeatures on this page
- Favorites panel In Review
- Alt unit display In Review PR Pending
- Slice settings history In Review
- Animated print status In Review
- Animated tab icons In Review
- New infill patterns Researching
- Transform tool cycling Researching
- Local version control In Review
- UI color settings In Progress
- Dual axis move and scale In Progress
- Slice path preview player In Progress
- Plate position snapping In Progress
- Quick position shift ticks In Progress
- User model library In Progress
- Animated splash screen In Progress
- Part stacking Researching
CrashSlicer V2.4
A custom OrcaSlicer build by CRASH Space: all the features below, plus a CrashSpace theme, custom icon, and cutting-edge additions not yet in upstream OrcaSlicer.
CrashSlicer packages Theo’s active feature work into a ready-to-run build for CRASH Space members and the broader community. Rather than waiting for each feature to land in upstream OrcaSlicer, this build lets you try everything in one place with a CrashSpace-branded look and feel and additional community-specific tweaks not included in the individual PRs.
Custom CrashSpace theme and accent color · Custom app icon · Cutting-edge features not yet submitted upstream · Community-specific default profiles
Dev build -V2.4.0. These are GitHub Actions artifacts; you may need to be logged in to GitHub to download.
Photos
Video
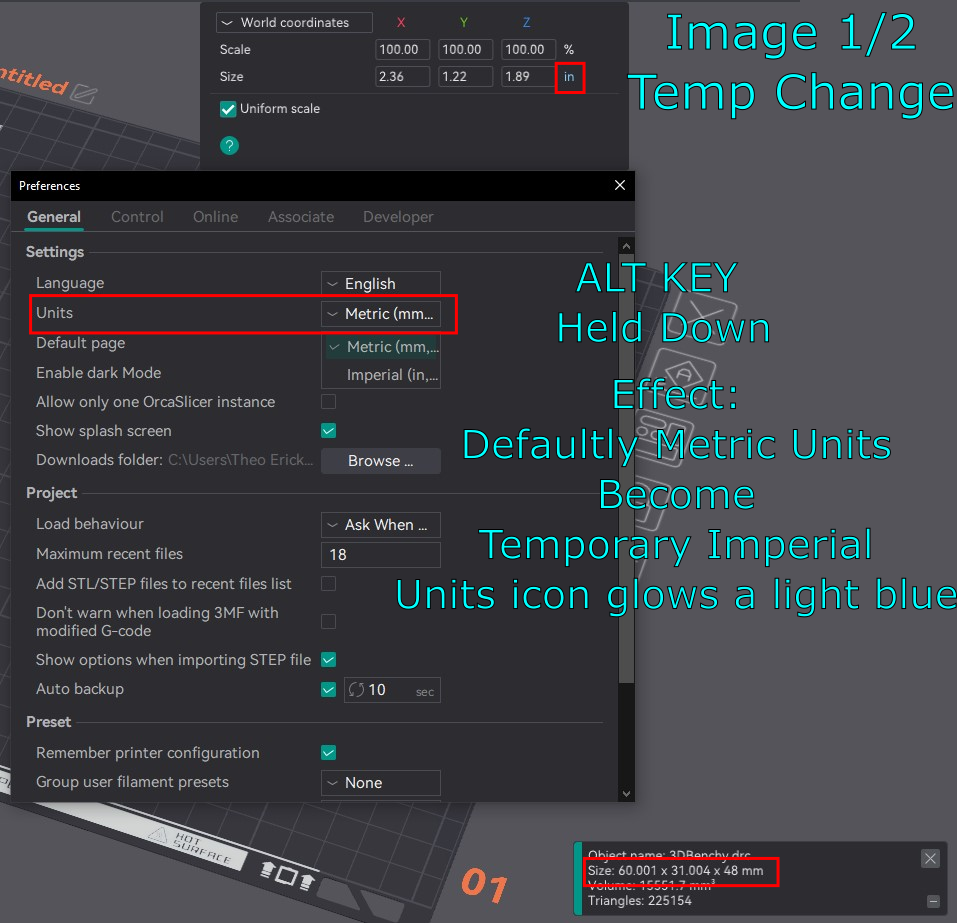
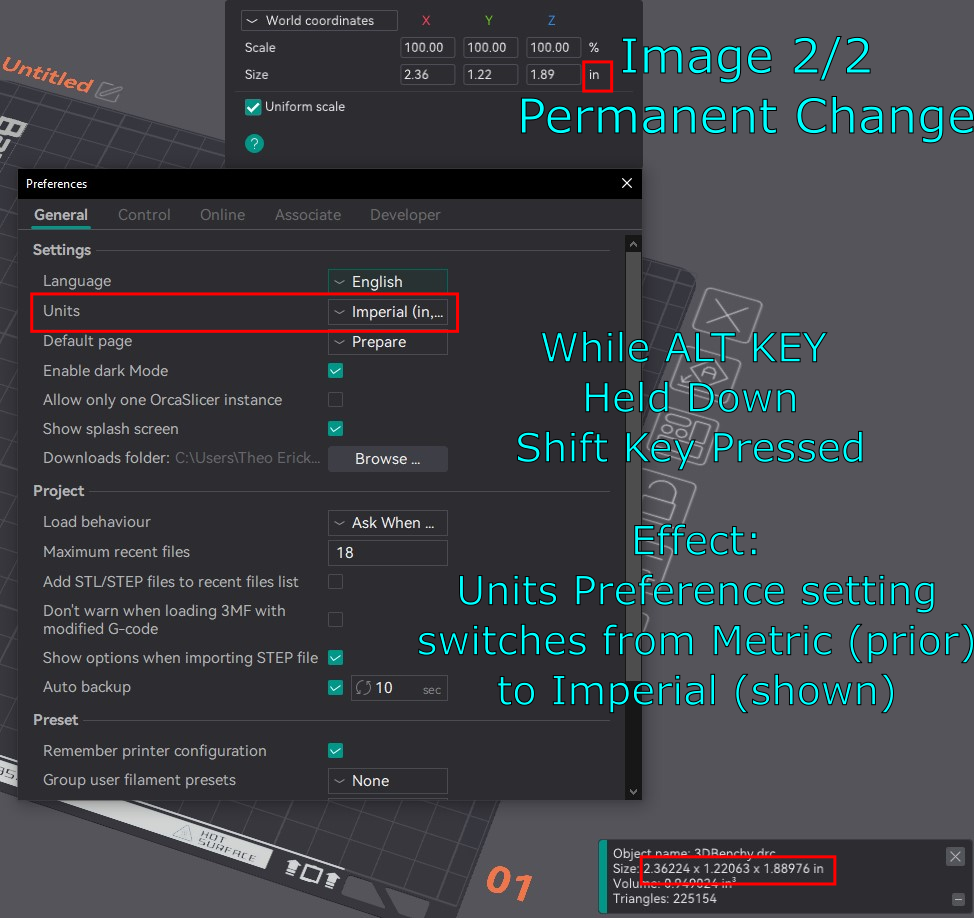
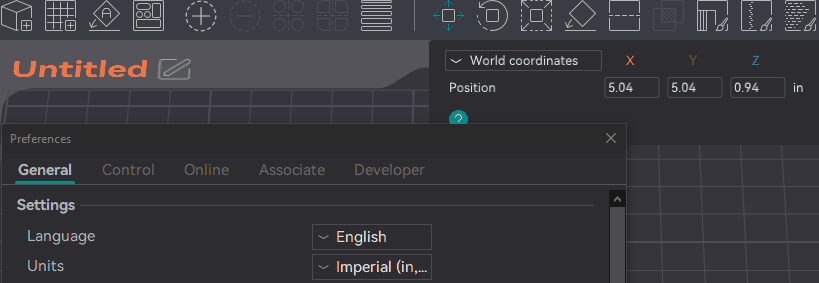
OrcaSlicer works exclusively in metric, which creates friction for users more comfortable with imperial measurements. This feature lets users hold Alt to temporarily swap the entire UI between mm and inches without changing any stored values.
While holding Alt, pressing Shift makes the swap permanent -it updates Preferences and AppConfig using the existing unit-change workflow. Currently active in the Plater’s Move and Scale tools, with expansion to the rest of the UI planned.
The Alt-key preview intentionally does not write to preferences -it is a transient display only, implemented via a UnitSystem singleton and a g_unit_alt_held global flag updated from the GLCanvas3D key handler.
Photos
Video
How to use
- Hold
Altto temporarily swap all visible units in the Move and Scale tools. - Release
Altto revert -no settings are changed. - While holding
Alt, pressShiftto make the unit swap permanent.
- 2025-04-01Add in Base Alt Unit UI Functionality + Add Move and Scale Implementation -Allows holding Alt to temporarily swap units from metric to imperial. Alt+Shift permanently swaps units via Preferences/AppConfig. Currently active in the Plater Move and Scale tools.46745f2
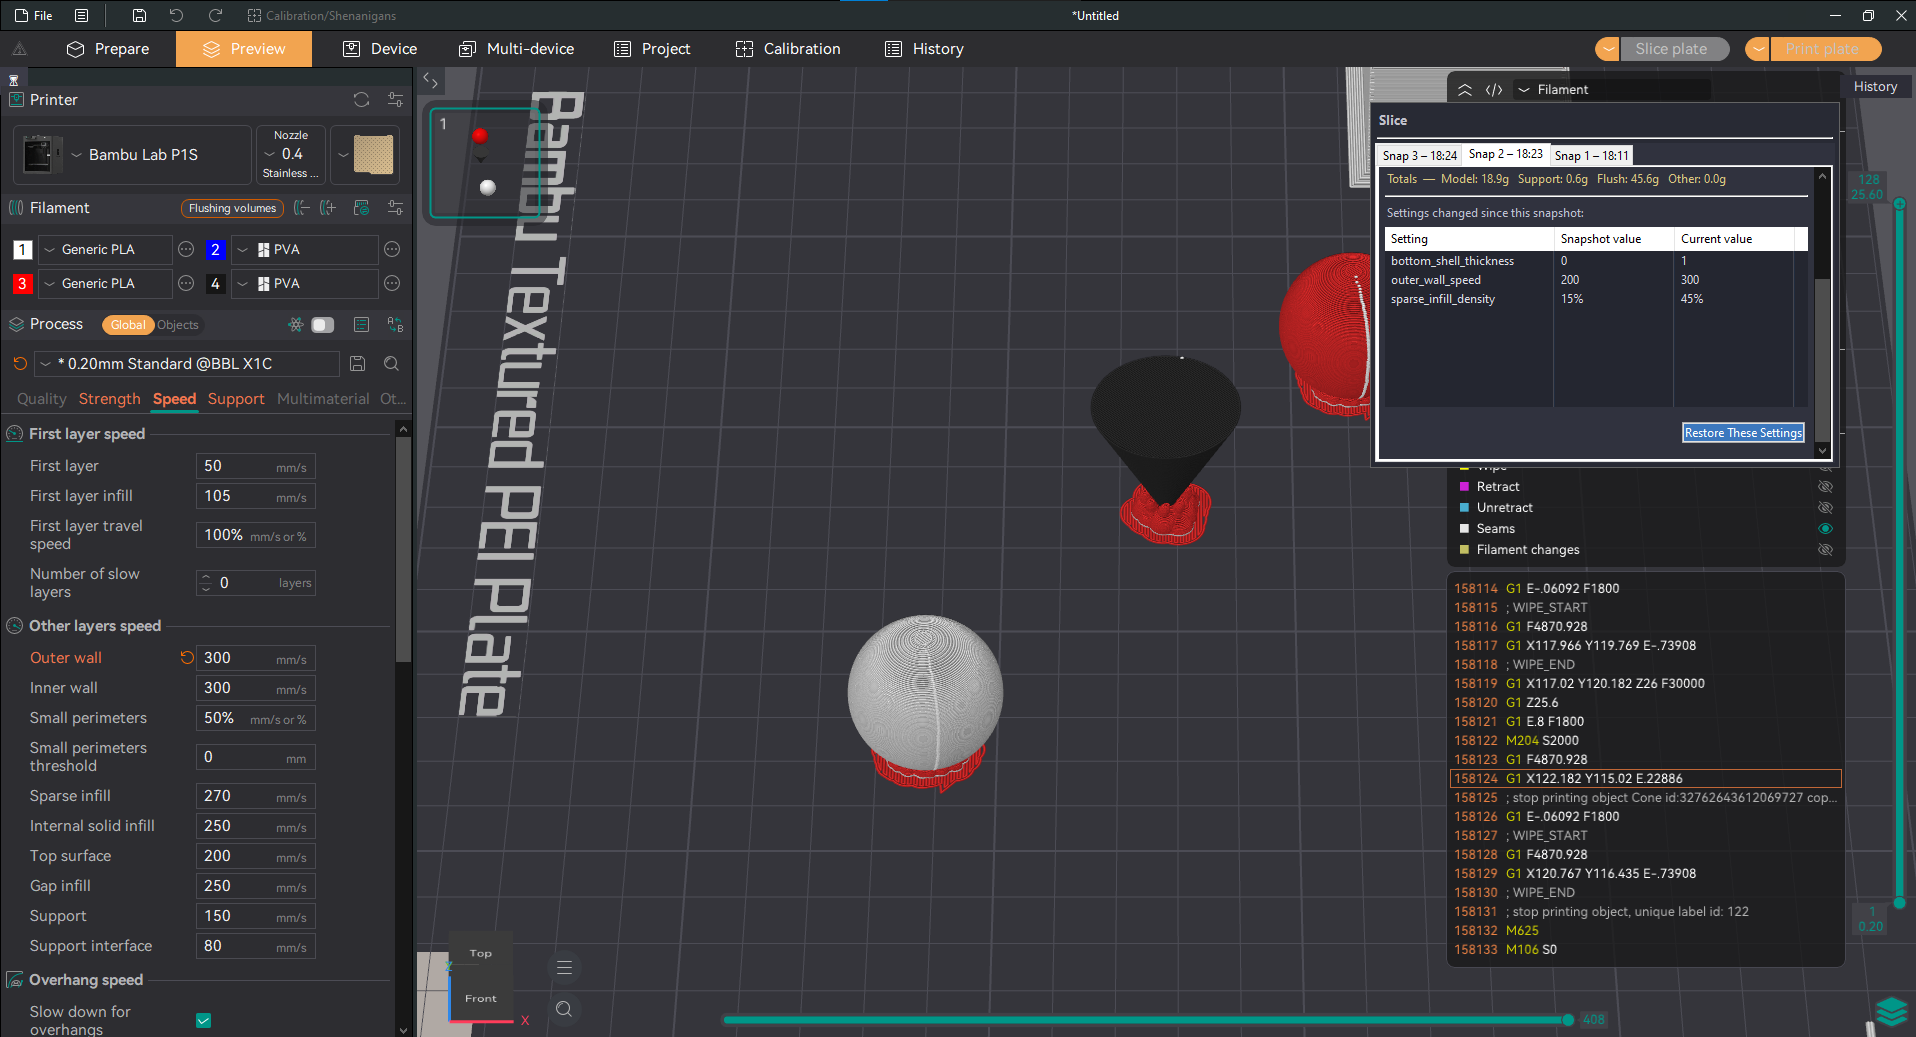
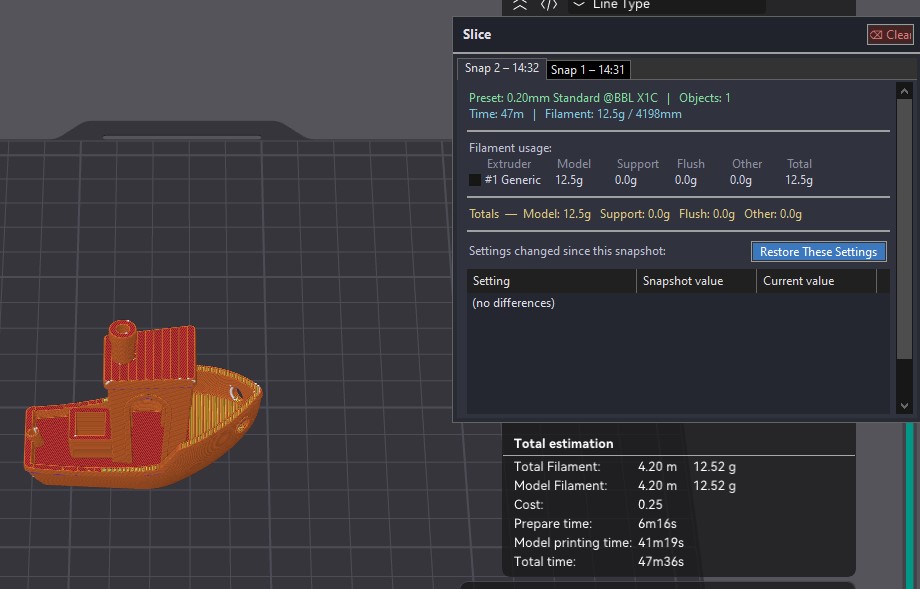
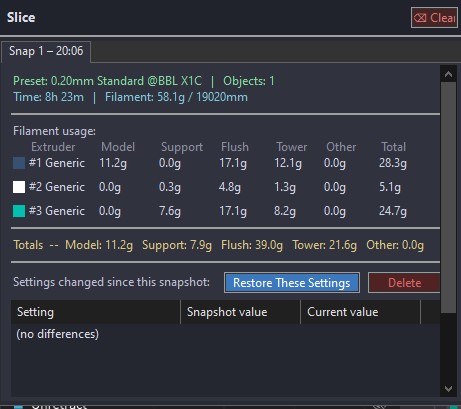
Every time you slice in OrcaSlicer, this feature automatically captures a snapshot of the settings used. A scrollable history panel lets you browse past slices, compare the settings diff between any two snapshots, and restore a previous configuration in one click.
Built as a SliceHistoryPanel (wxScrolledWindow) and SliceHistoryManager with JSON persistence via nlohmann/json. Each snapshot includes a per-extruder filament breakdown and a compact diff view that highlights only the settings that changed.
Photos
Video
How to use
- Slice a print as normal -a snapshot is saved automatically.
- Open the Slice History panel from the sidebar icon.
- Click any past snapshot to see a diff against the current settings.
- Click Restore to apply a snapshot’s settings to the current project.
- TODOAdd changelog entries here.
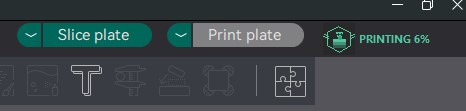
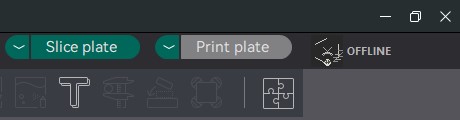
Replaces the static text status bar shown during slicing with a live animated indicator. Each printer state -idle, slicing, printing, paused, filament change, finished, failed, offline -has its own looping animated GIF icon that plays in the status area in real time.
Implemented using wxTimer-driven frame cycling with custom wxAutoBufferedPaintDC rendering. The animated icons are also exported as GIFs for use in documentation and UI previews. Longer status strings are handled with logic to prevent layout overflow.
Screenshots


Video
How to use
- Drop-in replacement -the animated status indicator appears automatically when the printer state changes. No configuration needed.
- TodayAdd Logic For Longer Strings + removed include for non existent file738e502
- TodayAdd in updated Animated Print Status Icons and gif logic89806d3
- TodayInitial commit of Animated print icon codee9aa7cf
- TodayInitial pass on animated svg imagesa106251
- TODOV2.0: Add theme browser with 12 themes and 15 states including 3 new states (Bed leveling, Error pause, Heating).
Replaces the flat sidebar tab buttons with smooth hover, press, ripple, and drain-fill transitions. A full AnimatedButton class handles per-button state with interpolated fill values driven by wxTimer.
A TabManager coordinator class ensures transitions are consistent across tabs -when one activates, others drain their highlight simultaneously. Rendering uses wxAutoBufferedPaintDC and wxGraphicsContext for cross-platform alpha compositing.
Overview
Individual icons


Video
How to use
- Drop-in replacement -animations run automatically. No user-facing configuration.
- TODOAdd changelog entries here.
Experimental work adding new infill pattern geometry options to OrcaSlicer’s fill engine. The goal is to expand beyond the existing pattern library with patterns optimised for specific use cases -including improved strength-to-weight ratios for structural parts and patterns that work better with flexible filaments.
Currently in the research phase -patterns are being evaluated for toolpath correctness, over-extrusion at path reversals, and compatibility with the existing wall and perimeter pipeline.
Photos
Video
How to use
- Not yet ready for general use -instructions will be added once patterns pass testing.
- TODOAdd changelog entries here.
Adds Space and Shift+Space as keyboard shortcuts to cycle forward and backward through the Move, Rotate, and Scale transform tools without touching the toolbar. This shortcut pattern is common in professional 3D software (Blender, Cinema 4D, etc.) and was previously missing from OrcaSlicer.
Planned implementation in on_key_down in GLCanvas3D.cpp with guards that prevent the shortcut from firing when a wxWidgets text input has focus, avoiding conflicts with typing in fields that use the Space key.
Photos
Video
Planned
- Select an object on the build plate.
- Activate any transform tool (Move, Rotate, or Scale) from the toolbar.
- Press
Spaceto cycle to the next tool. - Press
Shift+Spaceto cycle to the previous tool.
- —No commits yet -feature is in the research phase.
An OrcaSlicer-native version control system for 3MF project files. The History Panel automatically saves full 3MF snapshots of your project at configurable intervals, letting you roll back to any prior state with a single click -like “undo” that persists across sessions.
A dedicated Backup Storage Location menu lets you see where backups are saved, change the folder, open it directly in your file manager, and migrate existing backup files when switching locations.
Photos
Video
How to use
- Open the History Panel from the sidebar.
- 3MF snapshots are saved automatically -no manual action needed.
- Click any snapshot to preview its settings.
- Click Roll back to restore that snapshot as the current project.
- To change where backups are stored, open the Backup Storage Location menu from the panel header.
- 2025-03-31Add in Backup Storage Location Menu -See backup storage location, change it to another folder, open the folder directly, and migrate backup files on folder switch.f5ca809
- 2025-03-29Add In Local Version Control Functionality To History Panel1645ad9
- 2025-03-26Add in First Pass Of Print History Tabfd35acb
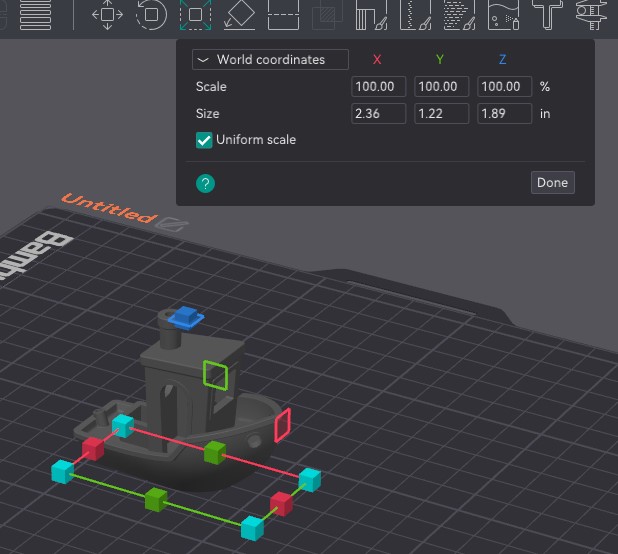
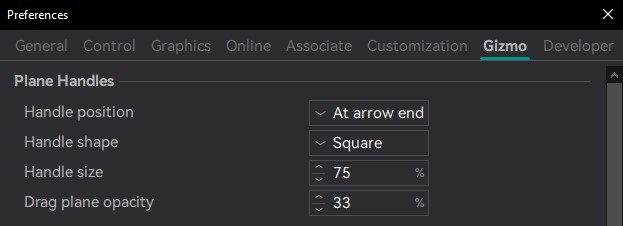
OrcaSlicer’s Move and Scale tools let you constrain to a single axis by dragging an arrow, or operate on all three axes uniformly. There was no way to operate on exactly two axes at once -something professional 3D software handles via the colored plane squares on the gizmo. This feature adds those plane handles.
Clicking and holding one of the plane squares moves or scales across two axes at once while the third axis stays locked. It is especially useful for scaling a model to a specific footprint without affecting its height, or for sliding an object along a surface without lifting it.
The plane squares follow the same color convention as the axes: red for YZ, green for XZ, blue for XY. The feature can be toggled and tuned from its own Preferences page.
Photos
How to use
- Select an object on the build plate.
- Activate the Move or Scale tool from the toolbar.
- Click and hold on one of the colored plane squares on the gizmo (red, green, or blue).
- Drag to move or scale along that plane -the perpendicular axis stays locked.
- TODOAdd changelog entries here.
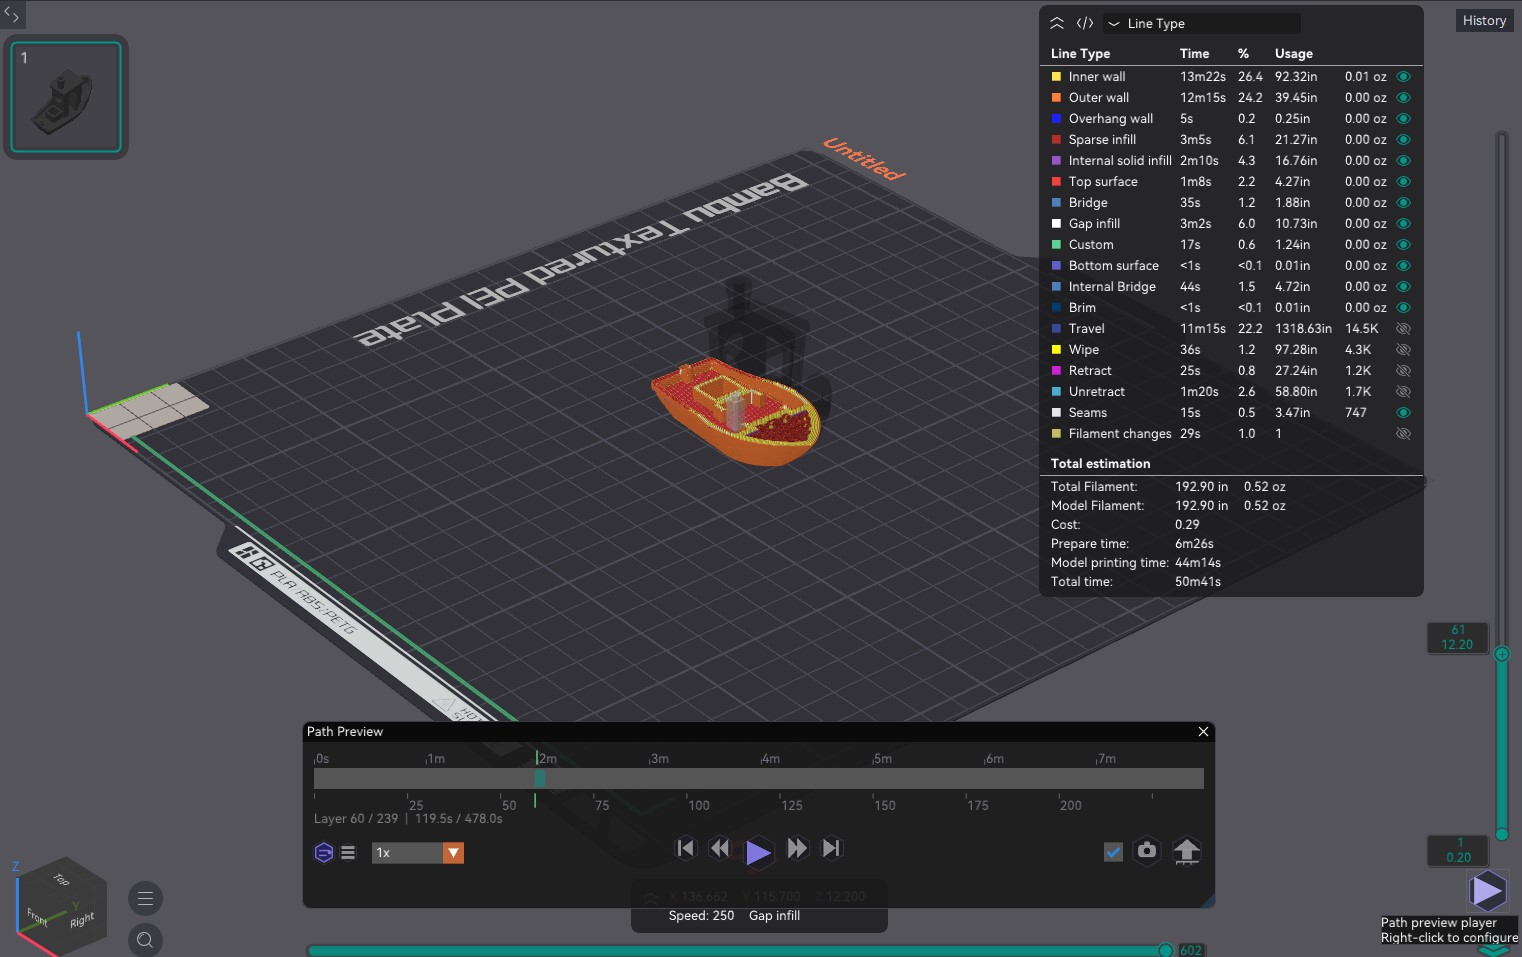
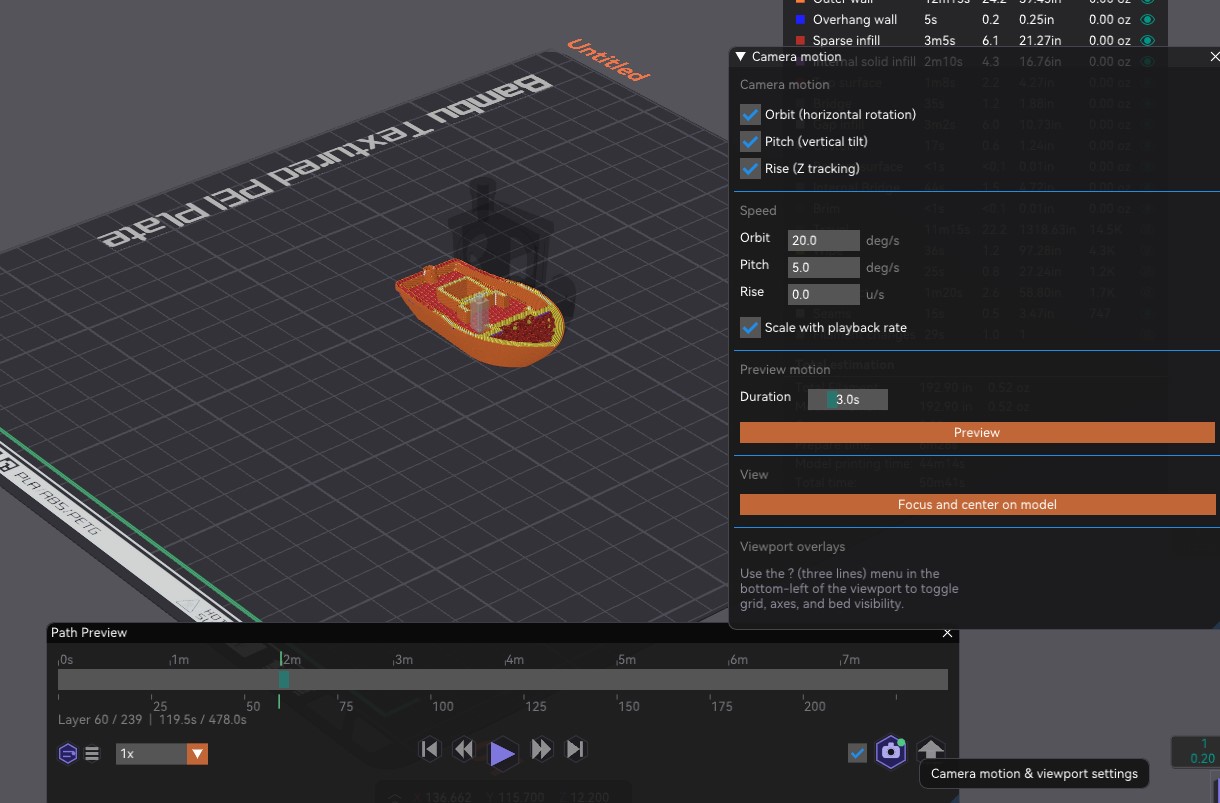
Previewing the sliced toolpath in OrcaSlicer used to mean holding down the arrow keys -no playback control, no speed setting, no way to jump by layer. The Slice Path Preview Player adds a floating player panel to the preview screen with a full playback bar for animating the toolpath.
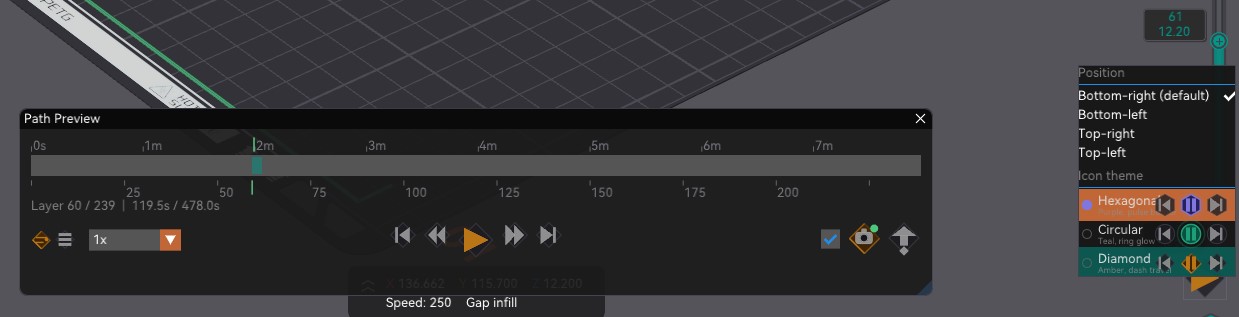
The playback bar gives you play, pause, and scrub control over the animation, plus per-layer and per-move stepping and a speed setting. You can also move the camera during playback to follow the path from different angles, with its own camera motion settings. The player’s appearance and on-screen position are adjustable from a right-click menu.
An alpha export feature can save the animated preview out as media, so you can share a clip of the print coming together. The export is still in beta, so expect rough edges while it is refined.
Playback bar
Settings

How to use
- Slice a model and switch to the Preview tab.
- Open the Slice Path Preview Player and press play on the playback bar to animate the toolpath.
- Use pause and the scrub bar to move to any point in the print, or step by layer or move.
- Enable camera motion in the settings to follow the path from different angles during playback.
- Right-click to adjust the player’s appearance and on-screen position.
- Use the export feature (beta) to save the animation out as media.
- TODOAdd changelog entries here.
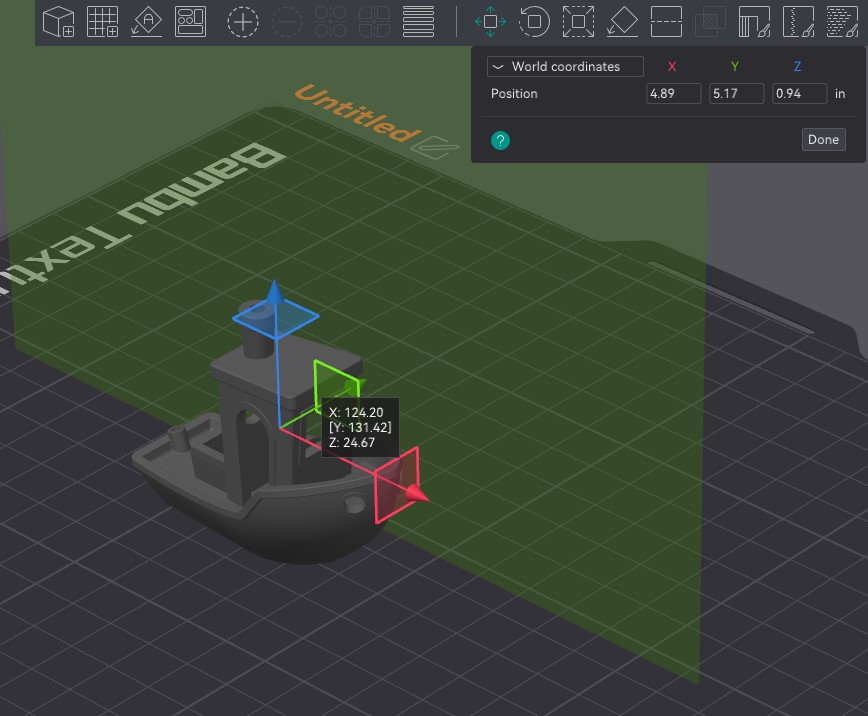
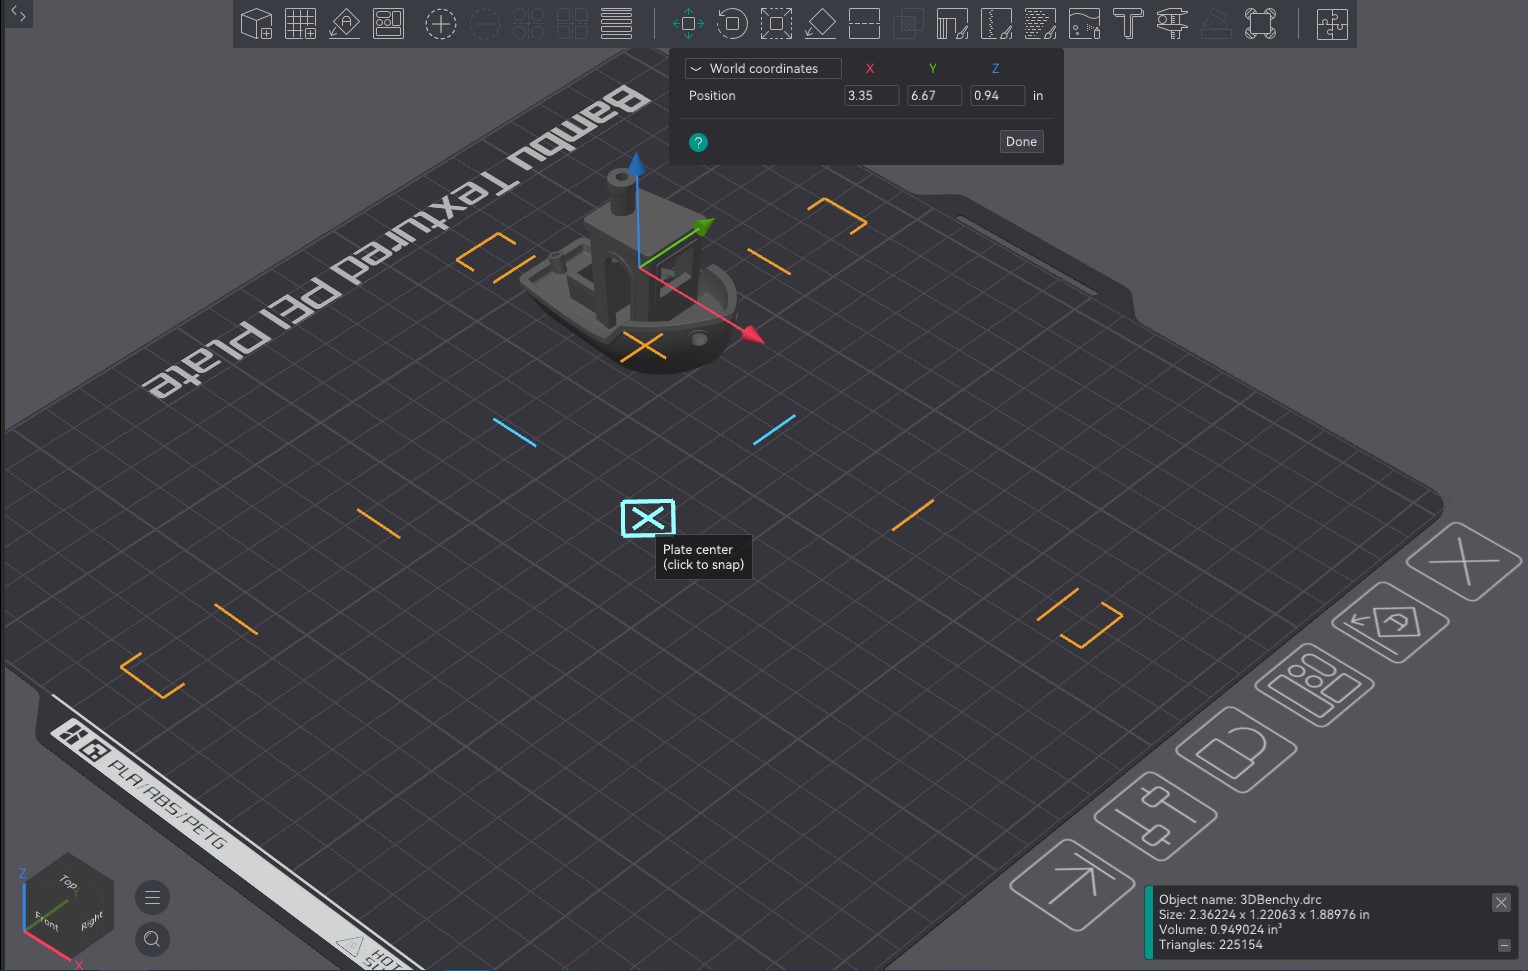
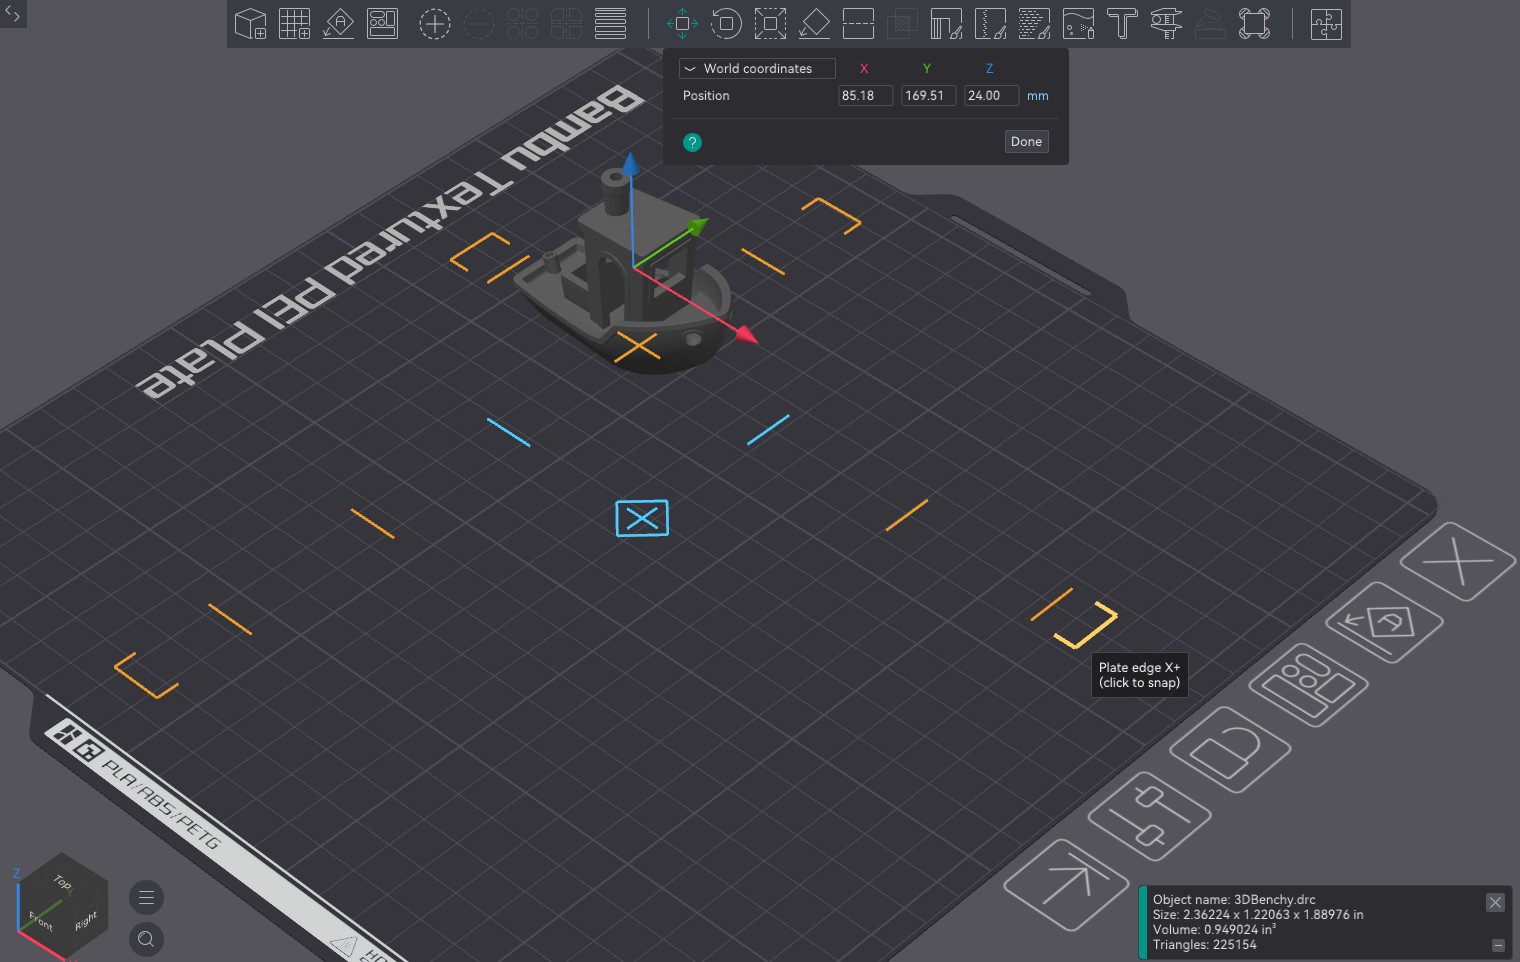
Placing an object precisely on the print plate normally requires typing in exact X/Y coordinates. Plate Position Snapping draws tick marks on the plate as you move an object, letting it snap to specific positions -the plate center, center X, center Y, and the plate edges.
As you drag, the relevant snap guides appear directly on the build plate, and the object locks onto a guide when it comes close. This makes it quick to center a part or line it up against an edge without opening a coordinate dialog.
Each snap target can be toggled individually in Preferences, so you can keep just the ones you use and disable the rest.
Photos
Overview
How to use
- Select one or more objects on the plate.
- Click the Snap button in the toolbar, or right-click and choose “Snap to position.”
- Pick a snap target from the menu: Center, X Axis, Y Axis, Top Edge, Bottom Edge, Left Edge, Right Edge.
- The selected object(s) jump to that position instantly.
- To disable specific snap points, open Preferences and toggle them under Plater → Snap positions.
- TODOAdd changelog entries here.
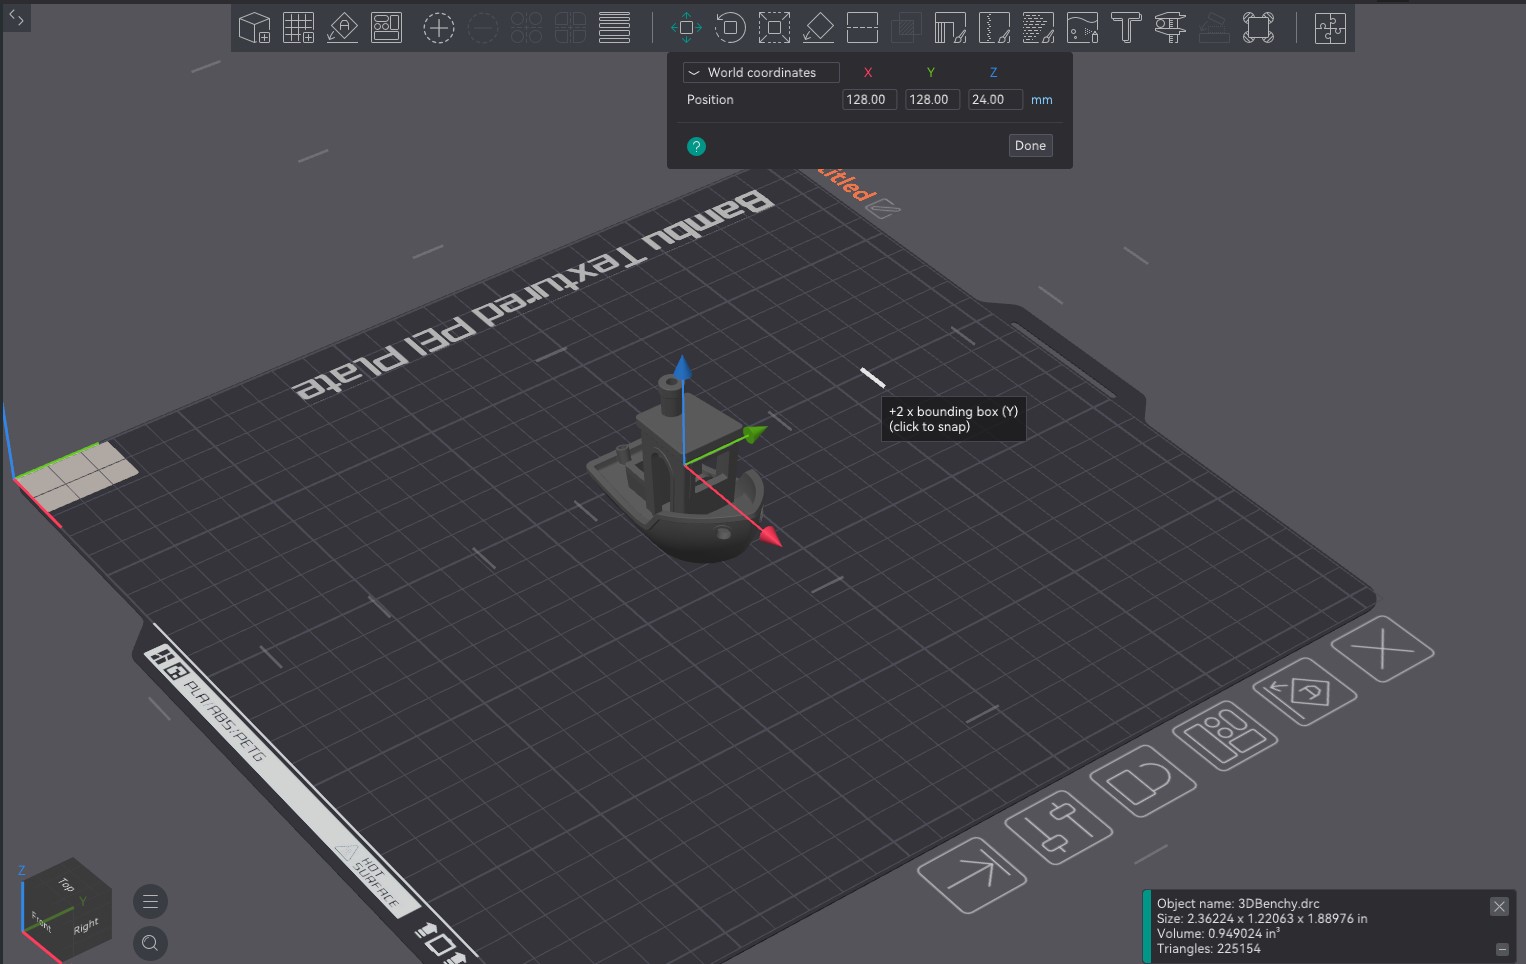
When arranging multiple copies of a model, you often want to shift one over by exactly its own width or depth -“move this one bounding box to the right.” Quick Position Snap Ticks draws gray tick marks at multiples of the selected object’s bounding box X and Y as you move it, making it easy to line objects up cleanly.
The ticks are spaced at 1x, 2x, 3x (and so on) of the object’s own bounding box, so snapping to one shifts the part by a whole multiple of its footprint. This keeps grids of parts evenly spaced without measuring or typing coordinates.
The snap threshold and behavior are exposed in Preferences so you can tune how strongly the object locks onto each tick.
Photos
How to use
- Select an object and activate the Move gizmo.
- Begin dragging along any axis -tick marks appear along the axis at bounding-box multiples.
- Move near a tick and the snap circle lights up. Release to snap precisely to that position.
- To configure which tick categories show, open Preferences → Gizmo → Snap Ticks.
- TODOAdd changelog entries here.
Photos
Replaces OrcaSlicer’s static startup splash with a themed, animated one. Nine designs are included -Circuit, Makerspace, CRASH Space, Synthwave, Cyberpunk, Deep Sea, Retro Gaming, Fantasy, and Techs-alotl -each with its own animated border and backdrop drawn around the logo, version, and loading status.
The theme is chosen from a new dropdown in Preferences, with a live animated preview so you can see each design before picking it. Two extra options round it out: Default (classic) keeps the original static splash, and Match print status theme ties the splash to whichever animated print-status icon theme is active.
On Windows the splash renders on its own thread and window, so it keeps animating smoothly even while the main thread is busy loading profiles and building the UI. macOS and Linux fall back to a stepped animation that advances as startup progresses. Rendering is shared between the live splash and the Preferences preview through a single draw_splash() compositor built on wxGraphicsContext, and the choice persists in AppConfig under app/splash_theme.
Photos
Video
How to use
- Open Preferences → General.
- Pick a design from the Splash theme dropdown -the preview animates live as you browse.
- Or choose Default (classic) for the original splash, or Match print status theme to follow your icon theme.
- The chosen splash appears the next time OrcaSlicer starts.
- TODOAdd changelog entries here.
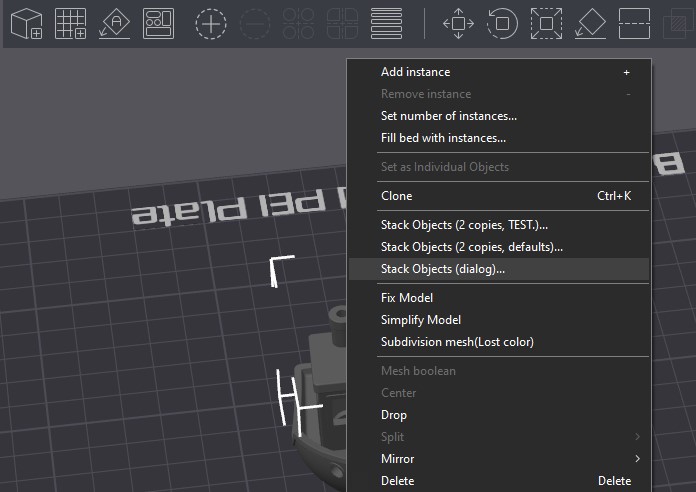
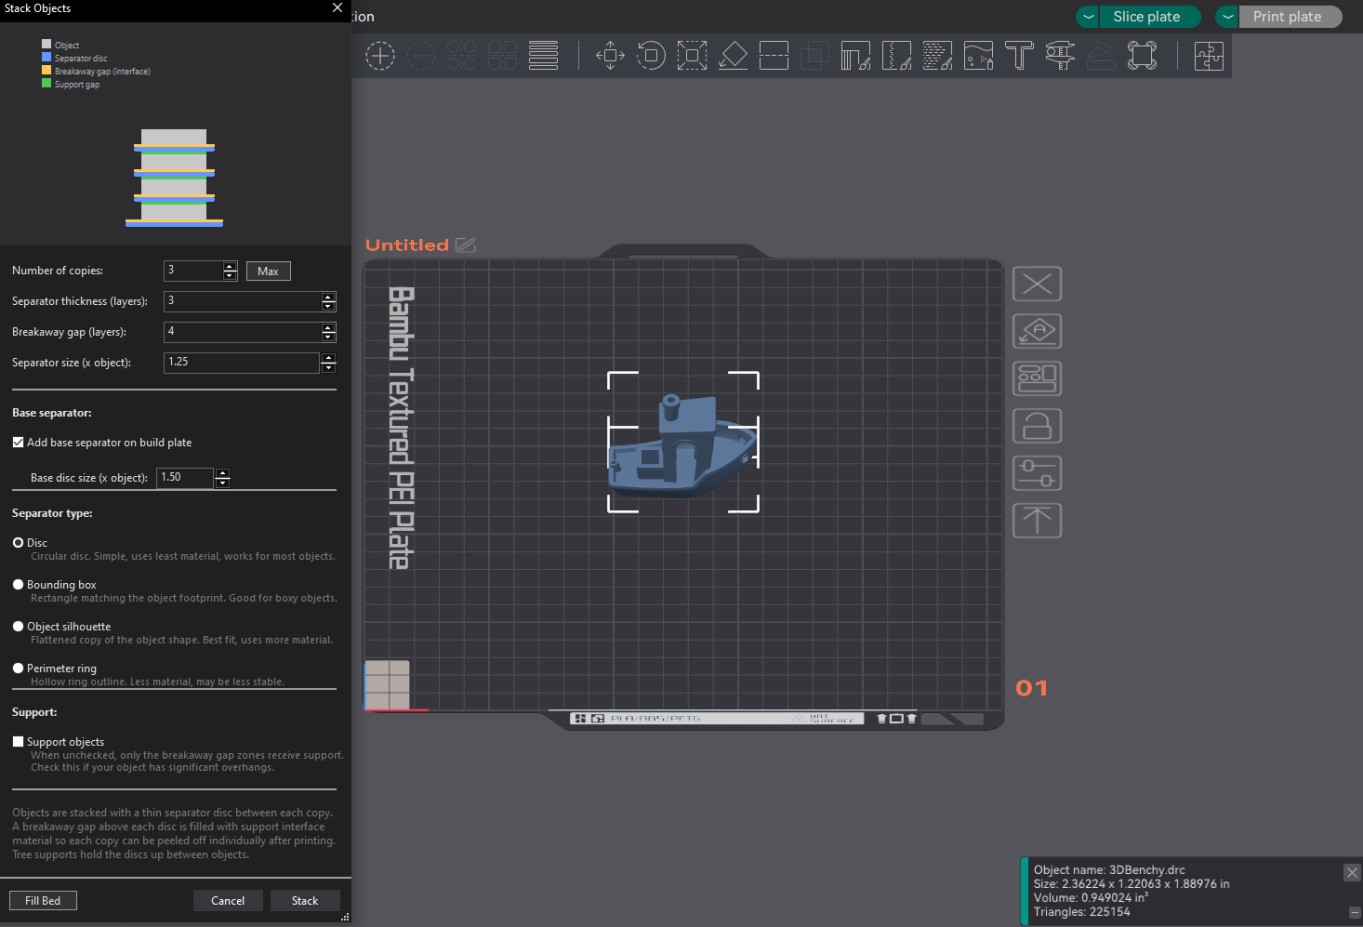
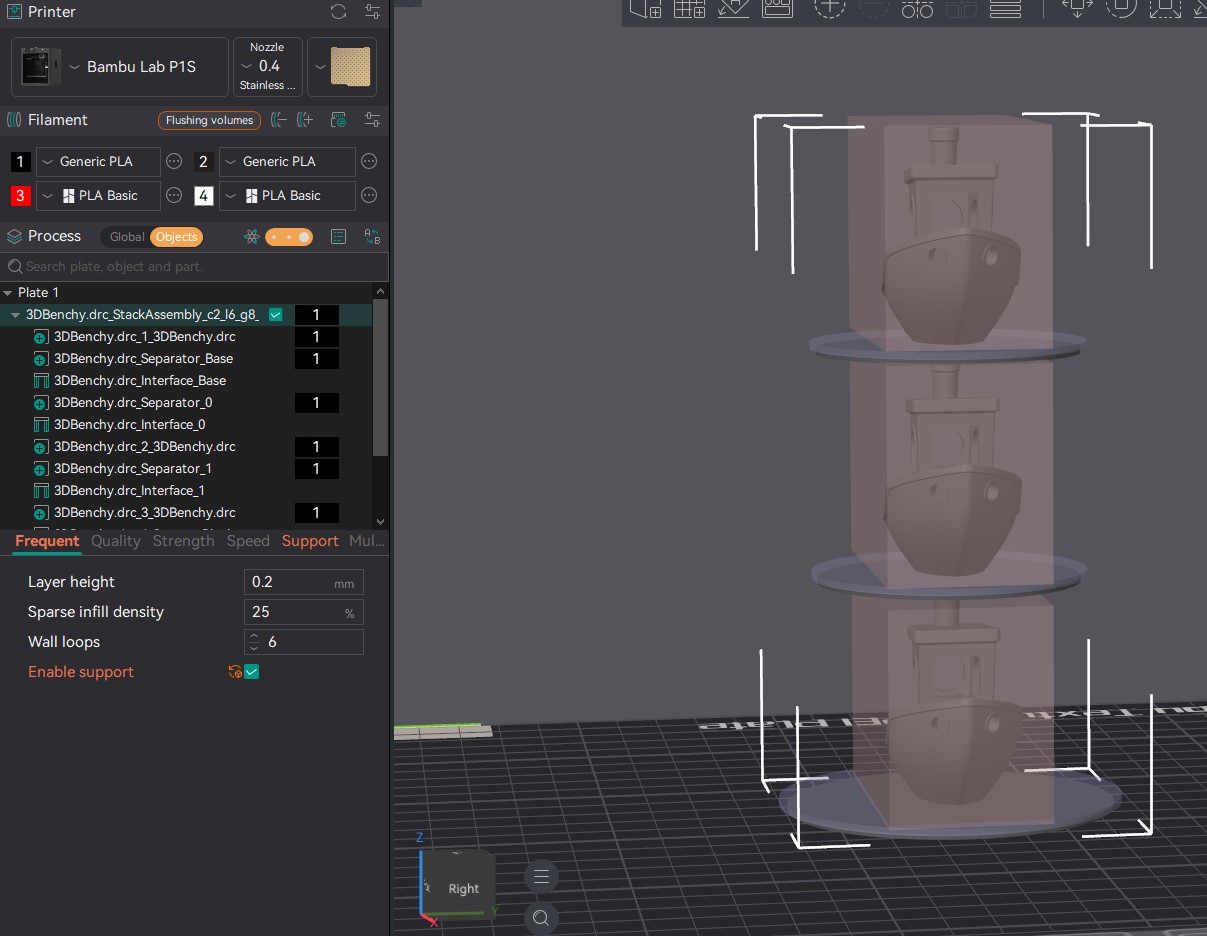
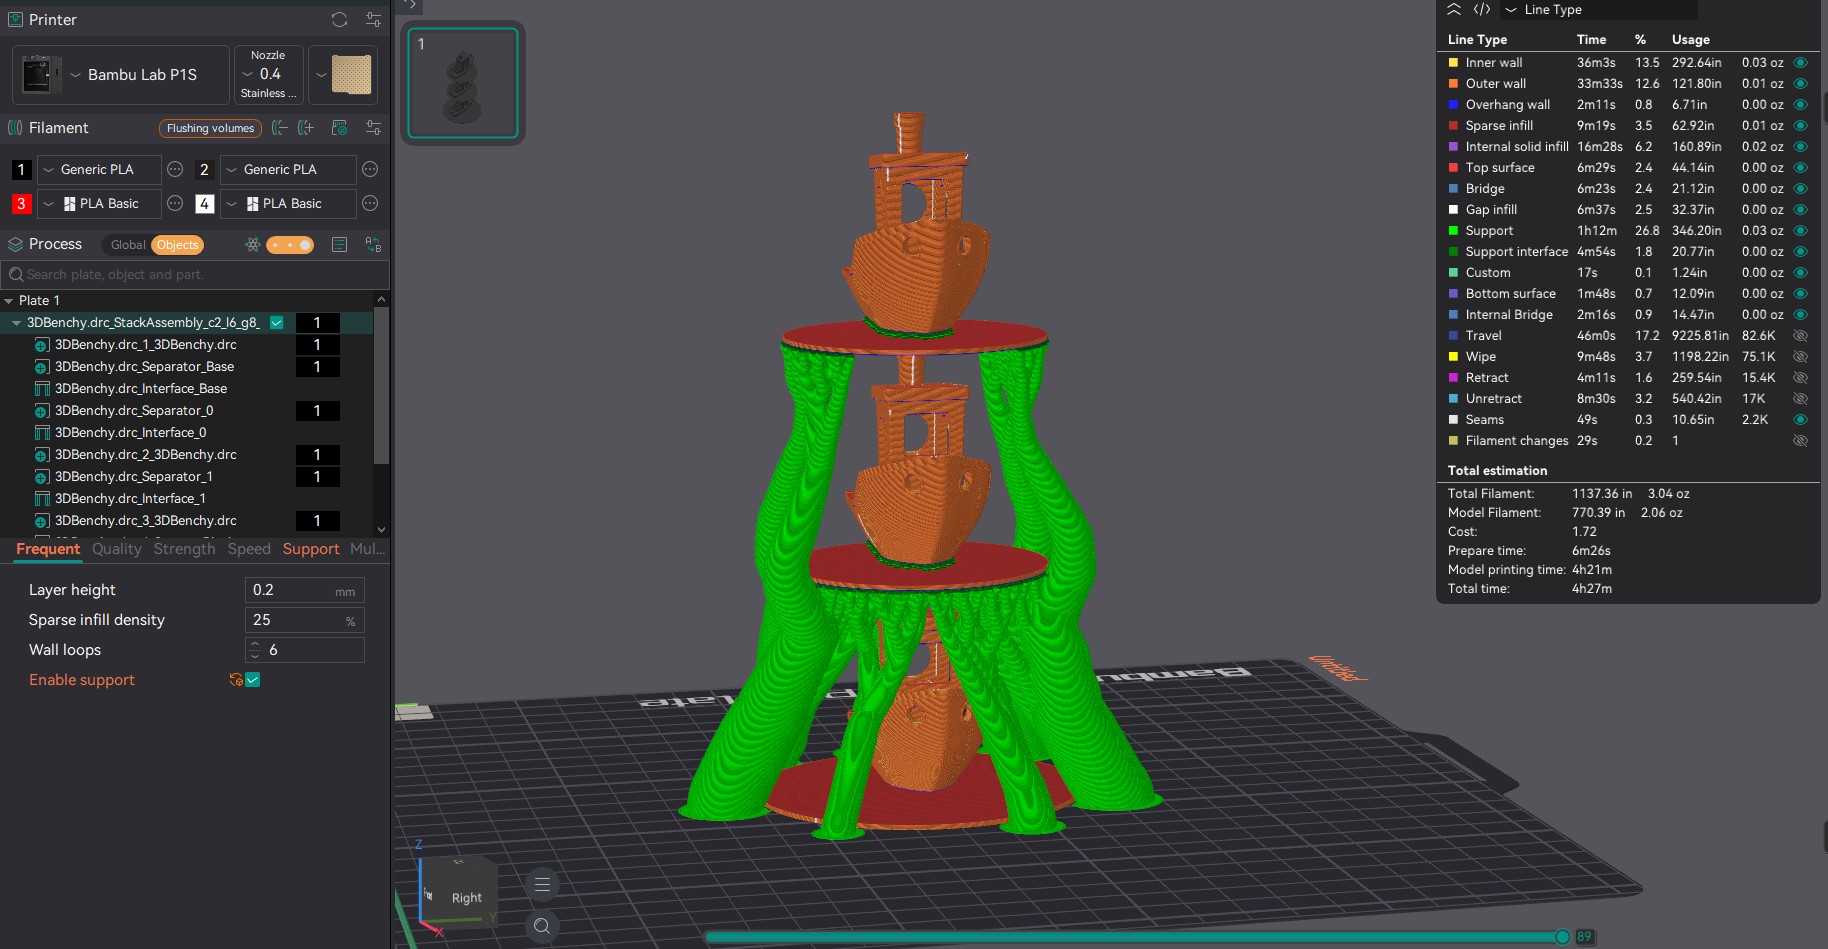
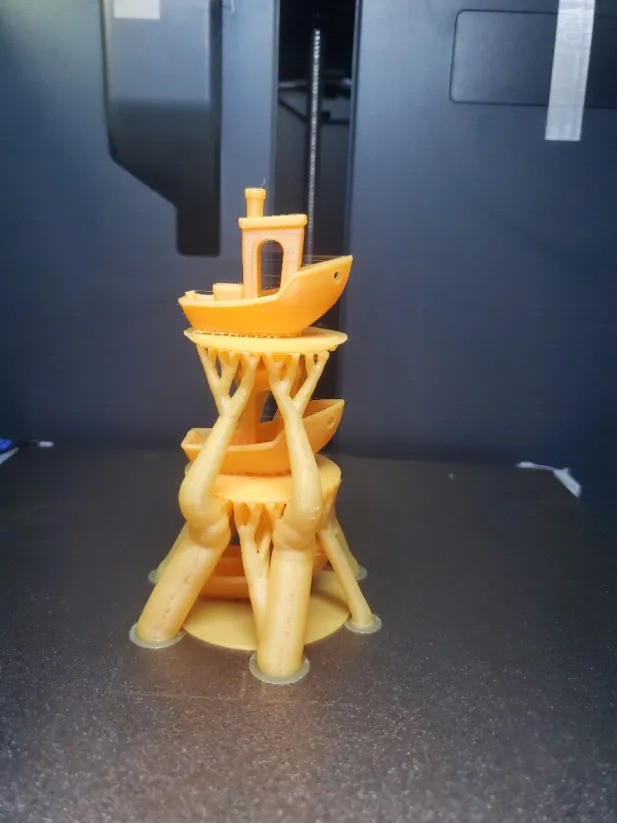
An experimental feature that attempts to stack parts along the Z axis, building blockers and support structure to hold each stacked copy up. The goal is to maximize build plate usage by growing upward instead of outward.
Because each stacked copy is printed on top of support rather than directly on the bed, this comes with tradeoffs: print quality is lower and the risk of a failed print is higher. It is best treated as a way to squeeze more parts onto a plate when surface quality is not critical.
This is an Alpha feature. Settings are exposed to make testing easier, but the behavior is still experimental, so use it with caution and expect to iterate on the settings for your specific part.
Settings & menus
Output
How to use
- Select the object you want to stack on the build plate.
- Right-click and choose the Part Stacking entry from the context menu.
- Adjust the exposed settings in the Part Stacking window to fit your part.
- Apply -the slicer builds the blockers and support structure to stack the copies in Z.
- Slice and inspect the Preview before printing to check the generated supports.
Alpha warning
- Because copies print on support rather than the bed, surface quality is lower and failure risk is higher.
- Best suited to maximizing plate usage when finish quality is not critical.
- Settings are exposed for testing -expect to iterate, and watch the first stacked print closely.
- TODOAdd changelog entries here.
Backup
OrcaSlicer – CrashSlicer feature branch
Active development of UX improvements, new capabilities, and visual polish for OrcaSlicer. These are open-source contributions in various stages of progress, check back for updates, photos, and build instructions as each feature matures.
View fork on GitHubFeatures on this page
- Favorites panel In Review
- Alt unit display In Review PR Pending
- Slice settings historyIn Review
- Animated print status In Review
- Animated tab iconsIn Review
- New infill patterns Researching
- Windowed path preview Researching
- Transform tool cycling Researching
- Local version control In Review
- UI color settings In Progress
CrashSlicer V1.1 – May 11 2026
A custom OrcaSlicer build by CRASH Space: all the features below, plus a CrashSpace theme, custom icon, and cutting-edge additions not yet in upstream OrcaSlicer.
CrashSlicer packages Theo’s active feature work into a ready-to-run build for CRASH Space members and the broader community. Rather than waiting for each feature to land in upstream OrcaSlicer, this build lets you try everything in one place — with a CrashSpace-branded look and feel and additional community-specific tweaks not included in the individual PRs.
Custom CrashSpace theme and accent color · Custom app icon · Cutting-edge features not yet submitted upstream · Community-specific default profiles
Dev build — V2.4.0. These are GitHub Actions artifacts; you may need to be logged in to GitHub to download.
Photos
Video
OrcaSlicer works exclusively in metric, which creates friction for users more comfortable with imperial measurements. This feature lets users hold Alt to temporarily swap the entire UI between mm and inches without changing any stored values.
While holding Alt, pressing Shift makes the swap permanent — it updates Preferences and AppConfig using the existing unit-change workflow. Currently active in the Plater’s Move and Scale tools, with expansion to the rest of the UI planned.
The Alt-key preview intentionally does not write to preferences — it is a transient display only, implemented via a UnitSystem singleton and a g_unit_alt_held global flag updated from the GLCanvas3D key handler.
Photos
Video
How to use
- Hold
Altto temporarily swap all visible units in the Move and Scale tools. - Release
Altto revert — no settings are changed. - While holding
Alt, pressShiftto make the unit swap permanent.
- 2025-04-01Add in Base Alt Unit UI Functionality + Add Move and Scale Implementation — Allows holding Alt to temporarily swap units from metric to imperial. Alt+Shift permanently swaps units via Preferences/AppConfig. Currently active in the Plater Move and Scale tools.46745f2
Every time you slice in OrcaSlicer, this feature automatically captures a snapshot of the settings used. A scrollable history panel lets you browse past slices, compare the settings diff between any two snapshots, and restore a previous configuration in one click.
Built as a SliceHistoryPanel (wxScrolledWindow) and SliceHistoryManager with JSON persistence via nlohmann/json. Each snapshot includes a per-extruder filament breakdown and a compact diff view that highlights only the settings that changed.
Photos
Video
How to use
- Slice a print as normal — a snapshot is saved automatically.
- Open the Slice History panel from the sidebar icon.
- Click any past snapshot to see a diff against the current settings.
- Click Restore to apply a snapshot’s settings to the current project.
- TODOAdd changelog entries here.
Replaces the static text status bar shown during slicing with a live animated indicator. Each printer state — idle, slicing, printing, paused, filament change, finished, failed, offline — has its own looping animated SVG icon that plays in the status area in real time.
Implemented using wxTimer-driven frame cycling with custom wxAutoBufferedPaintDC rendering. The animated SVG icons are also exported as GIFs for use in documentation and UI previews. Longer status strings are handled with logic to prevent layout overflow.
Animated status icons
 Idle
Idle Preparing
 Slicing
 Sliced
 Sending
 Calibrating
 Printing
 Paused
 Filament change
 Finished
 Failed
 Offline
Screenshots
Video
How to use
- Drop-in replacement — the animated status indicator appears automatically when the printer state changes. No configuration needed.
Replaces the flat sidebar tab buttons with smooth hover, press, ripple, and drain-fill transitions. A full AnimatedButton class handles per-button state with interpolated fill values driven by wxTimer.
A TabManager coordinator class ensures transitions are consistent across tabs — when one activates, others drain their highlight simultaneously. Rendering uses wxAutoBufferedPaintDC and wxGraphicsContext for cross-platform alpha compositing.
Overview
Individual icons
Video
How to use
- Drop-in replacement — animations run automatically. No user-facing configuration.
- TODOAdd changelog entries here.
Experimental work adding new infill pattern geometry options to OrcaSlicer’s fill engine. The goal is to expand beyond the existing pattern library with patterns optimised for specific use cases — including improved strength-to-weight ratios for structural parts and patterns that work better with flexible filaments.
Currently in the research phase — patterns are being evaluated for toolpath correctness, over-extrusion at path reversals, and compatibility with the existing wall and perimeter pipeline.
Photos
Video
How to use
- Not yet ready for general use — instructions will be added once patterns pass testing.
- TODOAdd changelog entries here.
A floating animated path preview player for the slice preview screen. A small corner button toggles an ImGui overlay panel with play/pause/scrub controls that animate the toolpath in real time — currently in the research and planning phase.
Two animation modes are planned: XY path mode (traces the nozzle path across a single layer) and layer build-up mode (sweeps upward through layers). Playback will drive GCodeViewer::set_toolpaths_move_range() via a wxTimer tick.
Will be implemented as an ImGui overlay to avoid needing a separate wxFrame OS window, which would cause z-order and focus issues on Windows and macOS.
Photos
Video
How to use
- Not yet available — instructions will be added once implementation begins.
- —No commits yet — feature is in the research phase. Branch link will be added once work begins.
Adds Space and Shift+Space as keyboard shortcuts to cycle forward and backward through the Move, Rotate, and Scale transform tools without touching the toolbar. This shortcut pattern is common in professional 3D software (Blender, Cinema 4D, etc.) and was previously missing from OrcaSlicer.
Planned implementation in on_key_down in GLCanvas3D.cpp with guards that prevent the shortcut from firing when a wxWidgets text input has focus, avoiding conflicts with typing in fields that use the Space key.
Photos
Video
Planned
- Select an object on the build plate.
- Activate any transform tool (Move, Rotate, or Scale) from the toolbar.
- Press
Spaceto cycle to the next tool. - Press
Shift+Spaceto cycle to the previous tool.
- —No commits yet — feature is in the research phase.
An OrcaSlicer-native version control system for 3MF project files. The History Panel automatically saves full 3MF snapshots of your project at configurable intervals, letting you roll back to any prior state with a single click — like “undo” that persists across sessions.
A dedicated Backup Storage Location menu lets you see where backups are saved, change the folder, open it directly in your file manager, and migrate existing backup files when switching locations.
Photos
Video
How to use
- Open the History Panel from the sidebar.
- 3MF snapshots are saved automatically — no manual action needed.
- Click any snapshot to preview its settings.
- Click Roll back to restore that snapshot as the current project.
- To change where backups are stored, open the Backup Storage Location menu from the panel header.
- 2025-03-31Add in Backup Storage Location Menu — See backup storage location, change it to another folder, open the folder directly, and migrate backup files on folder switch.f5ca809
- 2025-03-29Add In Local Version Control Functionality To History Panel — Full 3MF snapshot saving and rollback integrated into the History Panel.1645ad9
- 2025-03-26Add in First Pass Of Print History Tab — Adds a new main tab tracking recently loaded projects and recently generated G-code. Foundation for version control and recent work panel.fd35acb